Build a Multi-Currency Crypto Ticker with an ESP32 OLED Board
Introduction
In this tutorial you'll build a compact cryptocurrency ticker using an ESP32 development board with an integrated 0.96" (2.44 cm) OLED display. The project rotates through:
- BTC-USD
- BTC-EUR
- ETH-USD
- ETH-EUR
- SOL-USD
- SOL-EUR
using live market data from the Coinbase Exchange API.
The inexpensive ESP32 board (typically under $10) is available from Temu:
https://www.temu.com/goods.html?_bg_fs=1&goods_id=601099983427988
Requirements
- Arduino IDE
- ESP32 OLED board (CH340 USB interface)
- Wi-Fi connection
- USB cable
Installing ESP32 Support
Step 1
Open:
File → Preferences
Add:https://dl.espressif.com/dl/package_esp32_index.json
to Additional Board Manager URLs.
Step 2
Open:
Tools → Board → Boards Manager
Search for:ESP32
Install the latest package of:
ESP32 by espressif systems.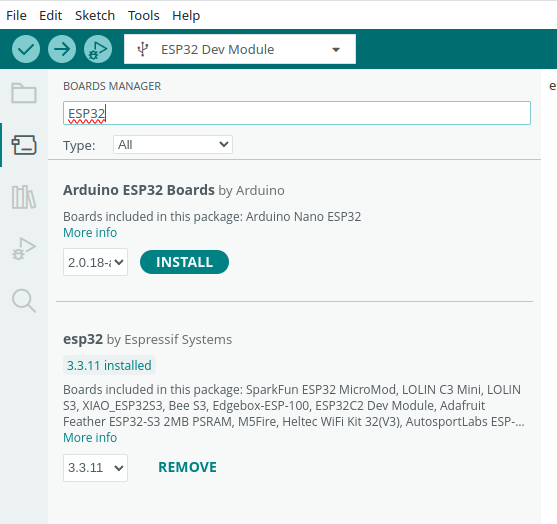
Step 3
Open:
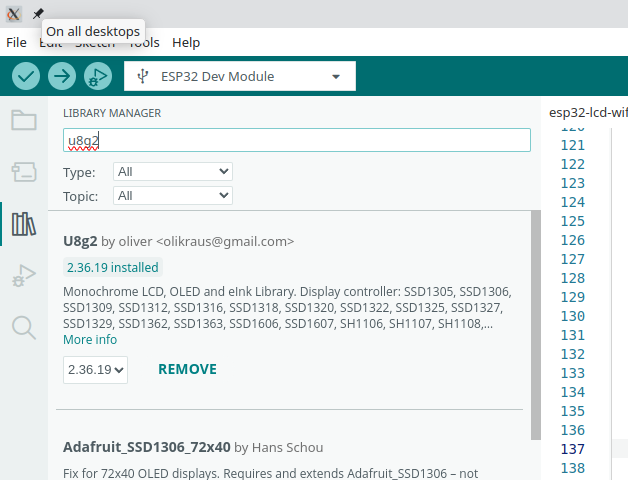
Tools → Manage Libraries
Install libraries:
- U8G2
- ArduinoJson
Step 4
Paste the following code into your new project in Arduino IDE, select "ESP32 Dev Board" and "/dev/ttyUSB0" and press the "Upload" Arrow button on the top left of the screen.
#include <Arduino.h>
#include <U8g2lib.h>
#include <Wire.h>
#include <WiFi.h>
#include <HTTPClient.h>
#include <ArduinoJson.h>

// Wi-Fi Credentials
const char* ssid     = "Router-Name";
const char* password = "Router-Password";

// Currency rotation parameters
const char* pairs[] = {"BTC-USD", "BTC-EUR", "ETH-USD", "ETH-EUR", "SOL-USD", "SOL-EUR"};
const int totalPairs = 6;
int currentPairIndex = 0;

// Screen Configuration
U8G2_SSD1306_128X64_NONAME_F_HW_I2C u8g2(U8G2_R0, /* reset=*/ U8X8_PIN_NONE, /* clock=*/ 22, /* data=*/ 21);

void setup() {
  u8g2.begin();
  Serial.begin(115200);

  // Connect to Network
  WiFi.begin(ssid, password);
  u8g2.clearBuffer();
  u8g2.setFont(u8g2_font_6x10_tf);
  u8g2.drawStr(0, 30, "Connecting to WiFi...");
  u8g2.sendBuffer();

  while (WiFi.status() != WL_CONNECTED) {
    delay(500);
    Serial.print(".");
  }
  Serial.println("\nWiFi Connected!");
}

void loop() {
  if (WiFi.status() == WL_CONNECTED) {
    HTTPClient http;
    String targetUrl;
    String displayPrice = "Loading...";
    String displayChange = "Loading...";
    bool fetchSuccess = false;

    // USD and EUR use the high-availability Exchange API
    targetUrl = "https://api.exchange.coinbase.com/products/" + String(pairs[currentPairIndex]) + "/ticker";

    http.begin(targetUrl);
    http.setUserAgent("Mozilla/5.0 (ESP32; Microcontroller)");

    int httpCode = http.GET();

    if (httpCode > 0) {
      String payload = http.getString();
      JsonDocument doc;
      DeserializationError error = deserializeJson(doc, payload);

      if (!error) {
        fetchSuccess = true;
        displayPrice = doc["price"].as<String>();

        // Clean up text trailing decimals for scannable screen rendering
        int dotIndex = displayPrice.indexOf('.');
        if (dotIndex != -1 && displayPrice.length() > dotIndex + 3) {
          displayPrice = displayPrice.substring(0, dotIndex + 3);
        }
      } else {
        Serial.print("Parsing error: ");
        Serial.println(error.f_str());
      }
    } else {
      Serial.printf("HTTP connection failed, error: %d\n", httpCode);
    }
    http.end();

    // Fetch historical data to calculate percentage change
    targetUrl = "https://api.exchange.coinbase.com/products/" + String(pairs[currentPairIndex]) + "/stats";

    http.begin(targetUrl);
    http.setUserAgent("Mozilla/5.0 (ESP32; Microcontroller)");

    httpCode = http.GET();

    if (httpCode > 0) {
      String payload = http.getString();
      JsonDocument doc;
      DeserializationError error = deserializeJson(doc, payload);

      if (!error) {
        fetchSuccess = true;
        float lastPrice = doc["last"].as<float>();
        float openPrice = doc["open"].as<float>();
        float changePercent = ((lastPrice - openPrice) / openPrice) * 100.0;
        displayChange = String(changePercent, 2) + "%";
      } else {
        Serial.print("Parsing error: ");
        Serial.println(error.f_str());
      }
    } else {
      Serial.printf("HTTP connection failed, error: %d\n", httpCode);
    }
    http.end();

    // Render Data to OLED Screen
    if (fetchSuccess) {
      u8g2.clearBuffer();

      // Draw Header UI Elements
      u8g2.setFont(u8g2_font_6x10_tf);
      u8g2.drawStr(0, 15, "MULTICURRENCY TICKER");
      u8g2.drawHLine(0, 20, 128);

      // Determine currency symbol based on active ticker name string matching
      String symbolPrice = displayPrice;
      String currentPairStr = String(pairs[currentPairIndex]);

      if (currentPairStr.endsWith("USD")) {
        symbolPrice = "$" + displayPrice; // Add leading Dollar sign
      } else if (currentPairStr.endsWith("EUR")) {
        symbolPrice = displayPrice + " EUR"; // Append trailing EUR text safely
      }

      // Draw Large Active Price with its currency sign modification applied
      u8g2.setFont(u8g2_font_ncenB12_tr);
      u8g2.drawStr(0, 41, symbolPrice.c_str());

      // Draw 24-hour change
      u8g2.setFont(u8g2_font_ncenB10_tr);

      u8g2.drawStr(0, 62, displayChange.c_str());

      // Draw Footer Currency Label
      u8g2.setFont(u8g2_font_ncenB10_tr);
      u8g2.drawStr(55, 62, currentPairStr.c_str());

      u8g2.sendBuffer();
      Serial.printf("[%s] Live Value: %s, Change: %s\n", pairs[currentPairIndex], symbolPrice.c_str(), displayChange.c_str());
    }
  }

  // Increment the counter loop array index to cycle to next configuration
  currentPairIndex = (currentPairIndex + 1) % totalPairs;

  // Set accurate display delay pacing interval to 5 seconds
  delay(5000);
}
How the Program Works
The sketch combines five major components:
- Wi-Fi
- HTTP requests
- JSON parsing
- OLED graphics
- Currency rotation
Included Libraries
- Arduino.h – Arduino framework.
- U8g2lib – OLED graphics library.
- Wire – I²C communication.
- WiFi – Wi-Fi connectivity.
- HTTPClient – HTTPS requests.
- ArduinoJson – JSON parsing.
Wi-Fi Credentials
The sketch stores your SSID and password:
const char* ssid = "Router-Name";
const char* password = "Router-Password";
Replace these with your own network credentials.
Currency Rotation
const char* pairs[] = {
"BTC-USD",
"BTC-EUR",
"ETH-USD",
"ETH-EUR",
"SOL-USD",
"SOL-EUR"
};
The variable currentPairIndex advances every loop so each pair is displayed for five seconds.
OLED Initialization
U8G2_SSD1306_128X64_NONAME_F_HW_I2C
This configures the integrated 128×64 SSD1306 OLED over hardware I²C using GPIO22 (clock) and GPIO21 (data).
setup()
The setup function:
- initializes the display
- starts Serial
- connects to Wi-Fi
- shows a "Connecting..." message
It waits until Wi-Fi is connected before continuing.
Downloading Live Prices
The ticker endpoint:
https://api.exchange.coinbase.com/products/BTC-USD/ticker
returns JSON including:
{
  "price":"118234.42"
}
The sketch extracts price.
To improve readability on the small OLED it trims the decimal places.
Calculating 24-Hour Change
The second API request:
/stats
returns:
- last
- open
- high
- low
- volume
The code calculates:
((last-open)/open)*100
to produce the daily percentage change.
Display Rendering
The OLED is divided into three sections.
Header
MULTICURRENCY TICKER
-------------------
Middle
Large font displaying the current price.
Footer
Shows:
- 24-hour percentage
- active trading pair
Currency Formatting
USD prices become:
$118234.42
EUR prices become:
106450.33 EUR
Automatic Rotation
After every update:
currentPairIndex =
(currentPairIndex + 1) % totalPairs;
wraps back to the first pair after SOL-EUR.
Delay
delay(5000);
Each currency stays visible for five seconds.
Possible Improvements
- Green/red arrows
- Historical charts
- Automatic brightness
- NTP clock
- Multiple exchanges
- Larger OLED display support
- Touch button to change currencies manually
- Deep sleep mode
Uploading
- Connect the board.
- Select the correct COM port.
- Select the ESP32 board.
- Upload.
- Open Serial Monitor (115200 baud).
After connecting to Wi-Fi the OLED begins cycling through all six cryptocurrency pairs automatically.
TODO
Proper error handling when network calls times out.
Next versions
- Instead of hard coding WIFI credentials and what coins to display, let the user configure them by sending serial commands.
Conclusion
With fewer than 200 lines of code and a low-cost ESP32 board, you can build a compact real-time cryptocurrency ticker that retrieves live prices over HTTPS, parses JSON efficiently, and renders attractive information on the integrated OLED display. The project is an excellent introduction to ESP32 networking, REST APIs, JSON processing, and OLED graphics while remaining easy to customize for additional cryptocurrencies or exchanges.
Need an Android Developer or a full-stack website developer?
I specialize in Kotlin, Jetpack Compose, and Material Design 3. For websites, I use modern web technologies to create responsive and user-friendly experiences. Check out my portfolio or get in touch to discuss your project.
Comments (1)